Dead Weight Tester
4.8 out of 5


If you are looking for the best and highly efficient device that will help you to calibrate any sort of testing instrument, then you must go with a Presto deadweight tester. This is one of the highly efficient testing instruments that will let you test both analog and d..read more
If you want to commence the test accurately with the help of a deadweight tester, then you can follow the below-mentioned steps:
- Place the tester on a strong rigid table. Direct rays of the sun should be avoided. The instrument should not be near a furnace or in a hot area. Dust is very harmful to the instrument.
- Clean the instrument with a soft cloth. Check the free movement of the free piston by moving it up and down by hand. The feel of dust in the piston should not be there. If necessary clean it as per maintenance instructions given later. Also, check the free rotation of the screw pump handle and the release valve.
- Install all components accurately.
- Place a spirit level on the weight carrier and level the instrument by means of the leveling screws and lock the leveling screws by tightening the lock nuts provided. If the tester is not moved, leveling needs to be checked only periodically. In a permanent installation, it is advisable to fix the base pads on the instrument table by screws in the screw holes provided.
- Pour clean hydraulic oil to approximately 2/3rd of the capacity of the reservoir. Open the release value.
- Turn screw pump handle clockwise fully. This will expel some air from the system which will bubble out in the oil cup.
- Turn the handle anti-clockwise fully to draw-in oil into the instrument.
- Repeat clockwise/anticlockwise turning of the handle a number of times until no bubbles appear in the oil cup.
- Remove blanking plug from the union connector.
- Turn Screw pump clockwise slowly until oil shows at the union connector. Install the gauge to be tested at the union connector using an adaptor if necessary. Please ensure that the gauge and adaptors are seated properly, tightened well and the assembly is rigid.
- Draw in oil fully and close the release valve.
In this way, you can easily commence the test accurately.
Features of Dead Weight Tester
There are many features you will get with the use of Presto deadweight tester. We have created a list of features below:
- Standard and stable Piston block for bringing accuracy in test results
- Mounted leveling screws for balancing the machine to avoid error in test results
- Reservoir Block to ensure constant oil flow during the test
- Union connector allows a wide range of devices to be connected for the test
- High-quality release valves utilized with a piping connection to gauge block
Technical specifications
- Testing range – 1 Kg/cm² to 100 Kg/cm².
- Steps of Range – 0.1 Kg/cm².
- Size of Union connector – M20x1.5, 1/4″ BSP, 3/8″ BSP.
- Size of Reservoir Block – 3/8” BSP.
- Piston Carrier – 1 Kgf /cm2Operating Fluid – 20W 40 grades Hydraulic Oil.
- Piston Material – High-Grade Stainless Steel.
- Accuracy – ± 0.5% (with master gauge).
Related Products

Preform Defect Chart
Dead Weight Tester

TP800 Spectrophotometer

Cap Pull out Tester

For More details & Information
Please fill this form

Dead Weight Tester
4.8 out of 5
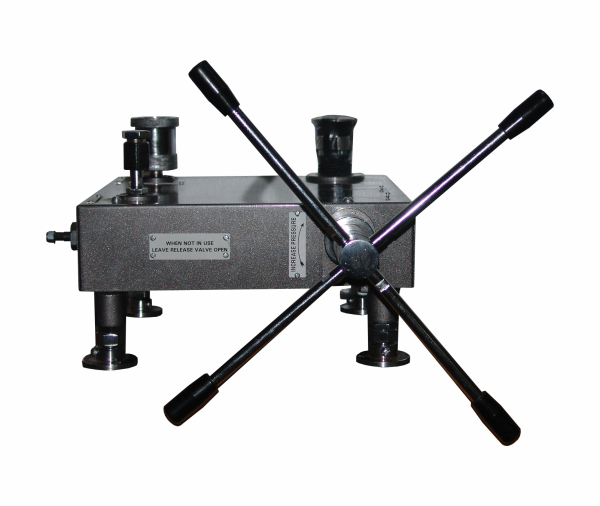
If you are looking for the best and highly efficient device that will help you to calibrate any sort of testing instrument, then you must go with a Presto deadweight tester. This is one of the highly efficient testing instruments that will let you test both analog and digital types of devices for measuring time, pressure, temperature, and another type of parameters. The user just needs to connect the device to the calibrator using the union connector. The working principle of this device is pressure balance. This testing device is used widely in research labs, industries, quality control departments, etc. It uses NABL certified known weights for exerting pressure on fluid until it reaches the equilibrium condition. Post reaching equilibrium, the user can check if the reading shown in the device under test is accurate or not. The machine doesn’t require any electrical input, works using simple mechanisms without any operative complications. It strictly adheres to international test standards.
Presto’s Dead Weight Tester is designed on a rigid steel base plate. The base plate is provided with 4 pegs for taking leveling screws with their locknuts and base pads. A sheet metal cover is provided for protecting the interconnecting piping against damage. It contains a screw pump, which is basically a plunger that moves into a cylinder when the screw pump handle is turned clockwise and pushes oil into the circuit to generate pressure. Anticlockwise turning of the handle serves to reduce pressure and also to draw in oil into the circuit at the start of the test. The screw pump is provided with a floating piston which has two “O” rings for leak tightness. A thrust bearing takes the axial thrust for easy operation. A stopper provided on the screw of the pump limits the maximum travel and the torque pin provided on the stopper and moving in guide strips provides the axial movement.
It has a solid steel piston block with drilled interconnections at the rear of the tester. The screw pump is fitted to it on the front side and free piston assembly is fitted on its top. A tube leads out from the piston block to the gauge block. The gauge block is mounted on the front side of the baseplate and is connected by piping to the piston block and to the reservoir block. A union connector ½” BSP is fitted on the top face for mounting the pressure gauge to be a tester. The connector is provided with a nylon seating washer and the pressure gauge to be tester must tighten on it. Use of Teflon (PTFE) tape is not required and will not provide leak tightness, bonded seals may be used if preferred. If an adaptor is used, the same remarks apply to its tightening on the union connector.
The reservoir block is provided with 3/8” BSP threads on the top side for mounting the oil reservoir. The oil from the reservoir flows into this block through the release valve into the piping connecting to the gauge block. The free-piston assembly is fitted directly on the top face of the main block and is in communication with the oil in the system. A weight CARRIER is placed on the free piston which serves as a table for loading more weights. The pressure equivalent of the weight of the carrier and piston is marked on the carrier. This is the minimum pressure that can be tested by the instrument. When oil pressure generated by the pump acts on the bottom of the free piston, the force produced pushes the loaded free-piston vertically upwards. The piston floats freely in its cylinder and the pressure in the circuit will be determined by the weights loaded divided by the effective area of the piston with corrections for gravity and some other factors. The effect of friction is minimized by rotating the piston along with the weights loaded on it. True floating action also requires that the piston be truly vertical. This is accomplished by leveling the top face of the weight carrier by means of a spirit level and the leveling screws. The free-piston is provided with the circlip lock (inside) to prevent it from accidentally ejecting out of its cylinder. The lock is not intended to stand the full force of the high pressure acting on the piston. This force must invariably be balanced by loading appropriate weights on the carrier. A red band (about ½” wide) is provided on the circumference of the cylinder of the free piston assembly. The piston will be free-floating if it is lifted anywhere within the red band. If the piston is lifted beyond the red band, the circlip lock will come into play and the piston is no longer free.
It has a set of weights and the top face of each weight including the carrier is marked with the pressure equivalent of its weight and the serial number of the tester for which it is calibrated. Every weight has a projection on the top face and a recess on the bottom face to facilitate stacking of the weights on the carrier or elsewhere. The range of weights will be 20 kg/cm2 to 100 kg/cm2. The least count will be 0.1 kg/cm2.
If you want to commence the test accurately with the help of a deadweight tester, then you can follow the below-mentioned steps:
- Place the tester on a strong rigid table. Direct rays of the sun should be avoided. The instrument should not be near a furnace or in a hot area. Dust is very harmful to the instrument.
- Clean the instrument with a soft cloth. Check the free movement of the free piston by moving it up and down by hand. The feel of dust in the piston should not be there. If necessary clean it as per maintenance instructions given later. Also, check the free rotation of the screw pump handle and the release valve.
- Install all components accurately.
- Place a spirit level on the weight carrier and level the instrument by means of the leveling screws and lock the leveling screws by tightening the lock nuts provided. If the tester is not moved, leveling needs to be checked only periodically. In a permanent installation, it is advisable to fix the base pads on the instrument table by screws in the screw holes provided.
- Pour clean hydraulic oil to approximately 2/3rd of the capacity of the reservoir. Open the release value.
- Turn screw pump handle clockwise fully. This will expel some air from the system which will bubble out in the oil cup.
- Turn the handle anti-clockwise fully to draw-in oil into the instrument.
- Repeat clockwise/anticlockwise turning of the handle a number of times until no bubbles appear in the oil cup.
- Remove blanking plug from the union connector.
- Turn Screw pump clockwise slowly until oil shows at the union connector. Install the gauge to be tested at the union connector using an adaptor if necessary. Please ensure that the gauge and adaptors are seated properly, tightened well and the assembly is rigid.
- Draw in oil fully and close the release valve.
In this way, you can easily commence the test accurately.
Features of Dead Weight Tester
There are many features you will get with the use of Presto deadweight tester. We have created a list of features below:
- Standard and stable Piston block for bringing accuracy in test results
- Mounted leveling screws for balancing the machine to avoid error in test results
- Reservoir Block to ensure constant oil flow during the test
- Union connector allows a wide range of devices to be connected for the test
- High-quality release valves utilized with a piping connection to gauge block
Technical specifications
- Testing range – 1 Kg/cm² to 100 Kg/cm².
- Steps of Range – 0.1 Kg/cm².
- Size of Union connector – M20x1.5, 1/4″ BSP, 3/8″ BSP.
- Size of Reservoir Block – 3/8” BSP.
- Piston Carrier – 1 Kgf /cm2Operating Fluid – 20W 40 grades Hydraulic Oil.
- Piston Material – High-Grade Stainless Steel.
- Accuracy – ± 0.5% (with master gauge).