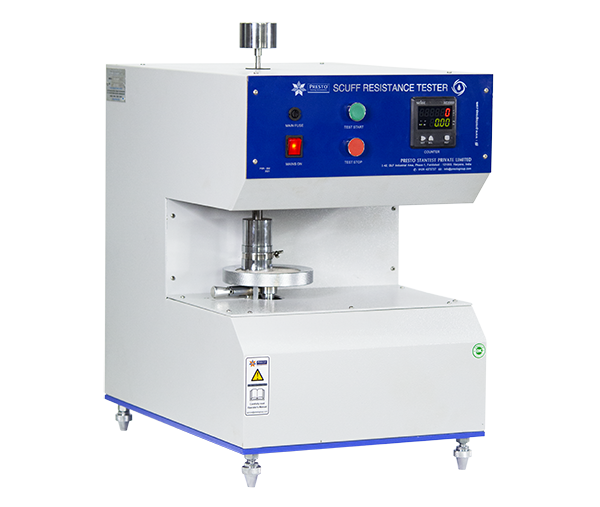
Scuff Resistance Tester- Model No.PSR - 292 Patent No. 336716


Packaging is a key component of the retail industry. In order to attract customers, it's important that your packaging stands out from the others. A great way to do this is by using good-quality prints on your material. Therefore, Presto has come up with one of the ..read more
The first step involves in finding the scuff resistance is to prepare the sample first. You can prepare the sample for the upper clamp by taking a smaller size of ” of template of 48mm (provided with the machine) to mark the specifications. You can cut the piece of the sample with it. For the lower clamp of the testing machine, the sample should be cut in a bigger size i.e. 120 mm. For this, you can take the bigger template of 120mm to mark the size of the sample for the lower clamp by placing it on the sample. Now cut the sample using a cutter or scissors. Now, you can place the sample accurately in this testing instrument.
For correct placement of sample, take the smaller section first i.e. 48 mm in size. Now uplift the lever pin to uplift the spindle to create a specific amount of gap between both the clamps. Open the gripping pin. Now place the sample on the upper clamp and clamp it firmly using the clamping grip. Now, open the Ring of the lower clamp. Place the sample of 124mm on the lower clamp. Clamp it firmly using the clamping ring for tight and wrinkle-free sample placement. Once you place the sample accurately, then you can start operating this testing machine. You can do this by turning ON the machine by plugging the main socket of the machine into a 3 pin 15 amp socket. Switch on the “Main ON button” from the control panel. HMI Screen will turn ON. Slide your figure to access the main screen. We get a screen with 5 menu options. Click on Profile setting Optional end Enter all required details. Note SET Count can be set maximum up to 9999 & weight 2 PSI. Click on the “SAVE” and “MAIN” Buttons. Pull up the Lever from the Panel slide to unlock the Clamp to Place the sample. After clamping both the samples firmly on the device, pull down the lever so that both the Samples of the upper and lower clamp touch each other. Click on the “TEST “Menu option. SET the Blower, SET Count, and click on Auto Mode. SET the Counter and Click on the “START” Button. ON completion of Test Press “STOP” button. You will get Pass and fail report once the test gets completed. In this way, you can easily test your specimen using this testing instrument. For further information, you can give us a call or email us. We will be happy to assist you.
Features of Scuff Resistance Tester- Model No.PSR - 292 Patent No. 336716
Scuff resistance tests are a crucial component in the packaging industry. Scuffs can be detrimental to your product's appearance and may lead to unnecessary returns. One way of preventing these problems is by testing for scuff resistance before production begins. Therefore, with the help of a Presto scuff resistance tester, you will easily be able to perform the scuff resistance test and can easily improve the quality of your packaging material. We have covered some features on how you can test for this type of damage before going into production with your package design by using our scuff resistance tester. So, read the features mentioned below:
- Easy to install and maintain.
- Reduce printing error by effective testing
- Highly accurate testing results of printing quality
- It has been pre-set with a large number of strokes (typically 100 cycles)
- Machine can be started as per customer specifications
- Sample can be tested within short span of time
- Consist of HMI display for accurate reading of test.
Technical specifications
- Model Type: Prima Model
- Test Weight: 2psi (Customized as per Requirement)
- Rubbing: Anti-Directional @60rpm by both upper jaw and lower jaw
- Display: HMI
- Digital Counter Range: 0-9999 Counts
- Diameter of Upper Clamp: 48mm ± 2mm
- Diameter of Lower Clamp: 120mm ± 2mm
- Upper Motor Capacity: 10kg/cm2 / 220VAC Single Phase Synchronus
- Lower Motor Capacity: ¼ HP / 220VAC Single Phase, 120RPM
- Rotation of Upper Clamp: Anti-clockwise @60 rpm
- Rotation of Lower Clamp: Clockwise @60 rpm
- Safety Lock Provided with: Provided with Panel
- Mode of Operation: Manual/ /Motorized
- Input Voltage: 5 Amp. 220 V AC, Single Phase, 50 Hz + Earth
- Sample Preparation Templates: 3 Nos. (50, 100, 200)
- Standard: ASTM F 2497-05
Related Products
Vacuum Leak Tester - Prima (Dry & Wet)
Crush /RCT/ECT /FCT- Digital cum Computerized Model

CO-Efficient of Friction Tester - Digital
Ink Abrasion Resistance Tester


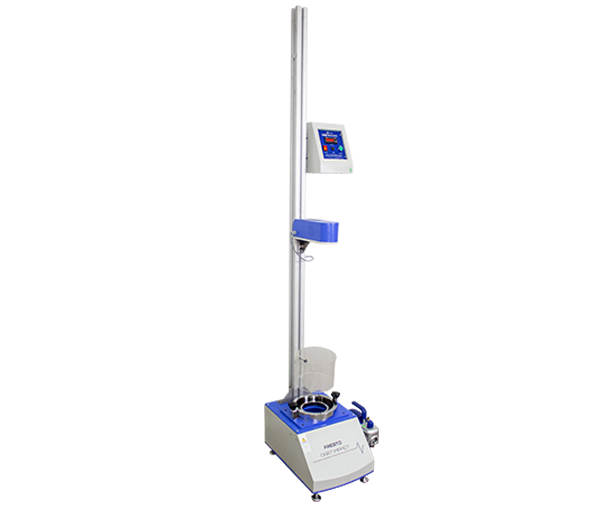
Scuff Resistance Tester- Model No.PSR - 292 Patent No. 336716
out of
Packaging is a key component of the retail industry. In order to attract customers, it's important that your packaging stands out from the others. A great way to do this is by using good-quality prints on your material. Therefore, Presto has come up with one of the most efficient testing machines known as a scuff resistance tester. This testing machine will help to evaluate the printing quality of various packaging materials. You will get a highly accurate test under uniform load and specified diameter. A package with a great print will be more attractive and provide you with an edge over other brands. You’ll need to consider both the image that you want to project as well as the type of ink that will best suit your needs if you want to ensure success. The Presto scuff resistance tester Prima series will help to test the quality of two printed surfaces by rubbing them against each other (face-to-face) in the same plane, at the same speed (60 rpm), under constant rubbing pressure. The rub test equipment can be used in the Paper & Packaging industries to evaluate color transfer from printed or coated surfaces during rubbing. The sample is attached to the base of the tester with the printed side up. A 2 psi test weight is attached to the sample and placed in position over the sample so that the printed sides are face to face. (Ensure use of customer specified material in place of the sample where required by customer). The tester is pre-set for the number of strokes (typically 100 cycles) and the machine is started as per the customer specification. After the required number of strokes, the samples are examined for any signs of ink transfer or scuffing. To conduct the test with the help of this testing instrument, you need to prepare the sample for the upper clamp and lower clamp. For this, the size of the sample for these two clamps will vary. The upper clamp needs a small size of the sample while the lower clamp will require a bigger size i.e. 120mm.
Once you prepare the sample, then you should clamp it firmly using the ring for tight and wrinkle-free sample placement. When you turn on the machine then HMI Screen will turn ON. Slide your figure to access the main screen. You will get a screen with a 5 menu option, you need to click on the profile setting and enter the details. When you save the details then you need to pull up the lever from the panel slide to unlock the clamp to place the sample to begin the test. With the help of this testing machine, you will get a pass or fail option for the test you have conducted. After the completion of the test, you should remove the weight from the device. The specimen is carefully examined to measure the extent of scuffing on the test sample or to examine any kind of scratches or damage to the print as per the specifications of the materials.
The first step involves in finding the scuff resistance is to prepare the sample first. You can prepare the sample for the upper clamp by taking a smaller size of ” of template of 48mm (provided with the machine) to mark the specifications. You can cut the piece of the sample with it. For the lower clamp of the testing machine, the sample should be cut in a bigger size i.e. 120 mm. For this, you can take the bigger template of 120mm to mark the size of the sample for the lower clamp by placing it on the sample. Now cut the sample using a cutter or scissors. Now, you can place the sample accurately in this testing instrument.
For correct placement of sample, take the smaller section first i.e. 48 mm in size. Now uplift the lever pin to uplift the spindle to create a specific amount of gap between both the clamps. Open the gripping pin. Now place the sample on the upper clamp and clamp it firmly using the clamping grip. Now, open the Ring of the lower clamp. Place the sample of 124mm on the lower clamp. Clamp it firmly using the clamping ring for tight and wrinkle-free sample placement. Once you place the sample accurately, then you can start operating this testing machine. You can do this by turning ON the machine by plugging the main socket of the machine into a 3 pin 15 amp socket. Switch on the “Main ON button” from the control panel. HMI Screen will turn ON. Slide your figure to access the main screen. We get a screen with 5 menu options. Click on Profile setting Optional end Enter all required details. Note SET Count can be set maximum up to 9999 & weight 2 PSI. Click on the “SAVE” and “MAIN” Buttons. Pull up the Lever from the Panel slide to unlock the Clamp to Place the sample. After clamping both the samples firmly on the device, pull down the lever so that both the Samples of the upper and lower clamp touch each other. Click on the “TEST “Menu option. SET the Blower, SET Count, and click on Auto Mode. SET the Counter and Click on the “START” Button. ON completion of Test Press “STOP” button. You will get Pass and fail report once the test gets completed. In this way, you can easily test your specimen using this testing instrument. For further information, you can give us a call or email us. We will be happy to assist you.
Features of Scuff Resistance Tester- Model No.PSR - 292 Patent No. 336716
Scuff resistance tests are a crucial component in the packaging industry. Scuffs can be detrimental to your product's appearance and may lead to unnecessary returns. One way of preventing these problems is by testing for scuff resistance before production begins. Therefore, with the help of a Presto scuff resistance tester, you will easily be able to perform the scuff resistance test and can easily improve the quality of your packaging material. We have covered some features on how you can test for this type of damage before going into production with your package design by using our scuff resistance tester. So, read the features mentioned below:
- Easy to install and maintain.
- Reduce printing error by effective testing
- Highly accurate testing results of printing quality
- It has been pre-set with a large number of strokes (typically 100 cycles)
- Machine can be started as per customer specifications
- Sample can be tested within short span of time
- Consist of HMI display for accurate reading of test.
Technical specifications
- Model Type: Prima Model
- Test Weight: 2psi (Customized as per Requirement)
- Rubbing: Anti-Directional @60rpm by both upper jaw and lower jaw
- Display: HMI
- Digital Counter Range: 0-9999 Counts
- Diameter of Upper Clamp: 48mm ± 2mm
- Diameter of Lower Clamp: 120mm ± 2mm
- Upper Motor Capacity: 10kg/cm2 / 220VAC Single Phase Synchronus
- Lower Motor Capacity: ¼ HP / 220VAC Single Phase, 120RPM
- Rotation of Upper Clamp: Anti-clockwise @60 rpm
- Rotation of Lower Clamp: Clockwise @60 rpm
- Safety Lock Provided with: Provided with Panel
- Mode of Operation: Manual/ /Motorized
- Input Voltage: 5 Amp. 220 V AC, Single Phase, 50 Hz + Earth
- Sample Preparation Templates: 3 Nos. (50, 100, 200)
- Standard: ASTM F 2497-05